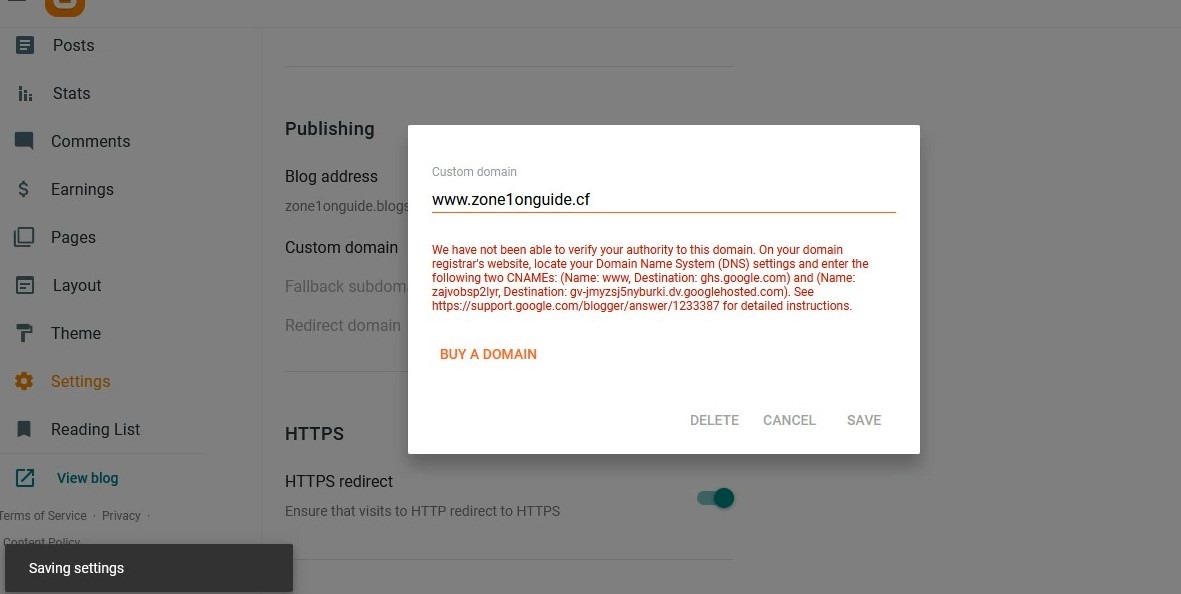
To add a domain to a blogger, follow the following steps if you bought this domain or got it for free. You can easily add it to your blogger website.
Get a free domain and add it to blogger step by step
- Go to freenom to get a free domain, Or go to your domain name service provider.
- Check your DNS management page. Steps: Manage domain > Manage DNS.
- And keep a DNS records page opened.
- Go to your blogger website admin panel.
- Go to settings > Scroll down until you find the publishing settings section.
- Choose a custom domain and there is a pop-up that will open.
- Enter at this pop-up your domain name as this example: (www. domain name . com)
- Press add domain.
- There is a red text will appear, take attention to this step it’s very important, so mark on the red text and copy it to TXT file, etc.
- You will find the text is saying the following:

On your domain registrar’s website, locate your Domain Name System (DNS) settings and enter the following two CNAMEs:(Name: www, Destination: ghs.google.com) and (Name: zajvobsp2lyr, Destination: gv-jmyzsj5nyburki.dv.googlehosted.com). See https://support.google.com/blogger/answer/1233387 for detailed instructions.
11. The marked red text is the destination of the record. And blue is the name of the record.
12. Go back to your Domain name service provider to the “Manage DNS page”.
13. Add 2 records with type the of CNAME.
Also, read how to make a free WordPress website?.
Attention: Don’t add the following quotations to your CNAME record. This is an example to add your CNAME record as it is shown to you on the blogger page. But add the same like
14. At the first record enter the name of the record as shown in the previous example “WWW“, and the destination is “ghs.google.com“.
15. At the second CNAME record, add the name “zajvobsp2lyr“, and the destination or target “gv-jmyzsj5nyburki.dv.googlehosted.com”.
16. After you added the 2 CNAME records as this pop-up asked to add your domain to the blogger website, revise your record entry again, and make sure it’s alright.
17. Press the “save” button that appears on the blogger pop-up. If there is an error, or it’s still unable to verify, don’t worry this step may take time, or about 10 minutes or 2 hours due to a DNS connection change.


